Your 8 ways to achieve an amazing straight stitch
- Kasia Kochanska
- May 5, 2020
- 4 min read
Updated: May 6, 2020
Hi guys, today I'm gonna introduce you 8 ways to a "Holy Grail" of sewing - a straight stitch!! and by a straight stitch I mean really straight, nice stitch, with no wiggles or dents, the stitch you can be proud of!
Whenever you learn to sew a straight stitch is a nightmare, I now , we all have been there! But that nightmare will end soon if you read this post and you will try to use it!
It's not that difficult if you know how!
So let's get to know how!
1. Use a ruler!
So simple! but yet, not much popular. Why, coz it takes time to draw a line! and if you have many stitches to do, drawing all them lines may put u off. I agree, this method is great for a "short distance", nerveless it works! Simply draw a line and follow it when stitching.
Important! You are looking at the needle going into your line.


2. Match a foot edge with the edge of the fabric.
One of my favourites in this showcase. The title says it all, but what is most important here is that you need to watch the fabric edge and the foot edge and try to match them as you go. If your eye will slip to check something else, accident happen! So pay attention and guide your fabric to the foot's edge. Warning! Make sure that your edge is quite straight when cutting.


3. 1/4 inch foot.
Without the quarter foot the whole patchwork/quilt world will cry! It's very clever that all that industry just said, we gonna use 1/4 inch seam allowance, and stick to it. So, whenever you are working on the patchwork or not, maybe it just happen that your seam allowance is 1/4 inch, use this foot for a perfect straight stitch. There is two types of them, one with the extra edge that helps you to guide the fabric to the edge of foot. Use this one! and again, look at the edges while sewing (not a needle)!


If you would like to purchase a foot like that please click here
4. Guide presser foot.
I have few of them. Adjustable and not adjustable, metal and plastic. All good and worth every penny!
Depend on what your project is the use can be endless. You can adjust the edge of the guide to the edge of your fabric and stitch any desired seam allowance, you can pick the line and do a second stitch (top stitch or quilting) by guiding yourself with lines. Remember, always look on the line and fabric edge (or previously done stitch) while sewing.


If you would like to purchase an adjustable presser foot please click here
or if you would like to purchase a plastic guided presser foot please click here
5. Guide lines on the needle plate.
I'm sure you have noticed you have some magic lines and sometimes numbers on the side of your presser foot. Those lines on the needle plate are your seam guide! And they are usually calculated from central position of your needle (it means, if you move your needle to far right or far left, those numbers won't work any more, but they still will give you a good straight stitch guidance). I recommend you to spend some time and get friendly with those lines and numbers. It will help you a lot with all the sewing you are planning to do in the future!


How does it work? Very similar to the previous methods, look at the line when sewing and provide your fabric to the line you've chosen.
6. Tape.
If you thing that line you've chose is too fine, can't see it well, no problem!


Grab some tape with a bit of colour, a masking tape, washi tape, anything. Place it right on the line and follow it when sewing. Seeing it better now? Yeah, me too!
7. Magnet.
If the tape on the guide line is still not good enough and your fabric is going sideways, you can always stick a magnet to the side of your presser foot and it will stop (to a degree) the fabric from crossing over the line.


If you would like to purchase a smiley face magnet please click here
or if you would like to purchase a sewing machine magnet please click here
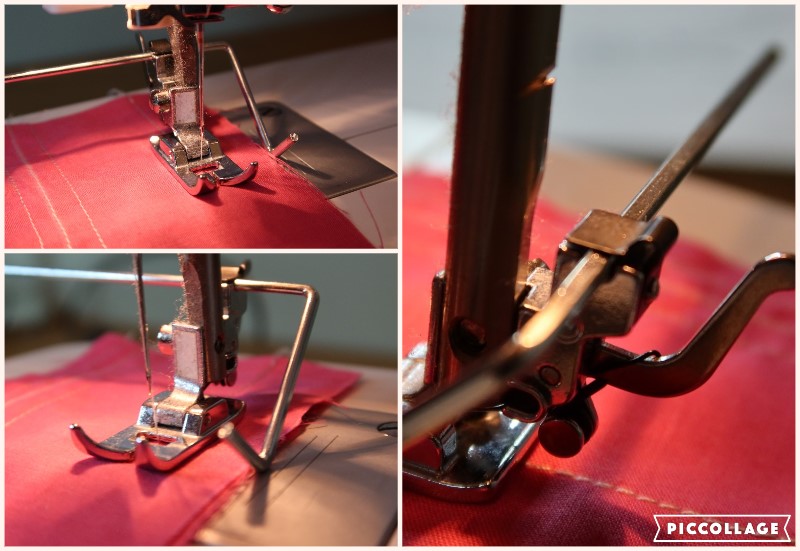
8. Guiding stick (lol)
Ok guys, I have no idea what that thing is called in English, if anyone knows, please en-light me! It's called "prowadnica" in Polish lol. Anyway, it helps a lot, and most of the sewing machines comes with it, although not many people have an idea what to do with it! Well, you need to stick its long end under a small black flap at the back of your presser foot (check the picture). The curved bit goes down and the length it's up to you! You can set it as a side bar for the fabric to go beside it or a stitch line guide when quilting.

I hope all that info will help you create a perfect stitch and you will say:
Happy sewing everyone!
Don't forget to subscribe to get freebies and stayed tuned!
XX
#8 Guiding Stick: I was so blessed to get a new machine last weekend. The salesperson said it was a quilting guide. I just looked in the owners manual, and it calls it an edge guide.